SPECIALIZED TOOLS
There are several specialized tools that you will need to make fine intaglio prints. Most of these can be found online. Several companies I like to purchase materials are Graphic Chemical and Ink Co. and Renaissance Graphic Arts.
Printmaking Needle
Burnisher (furnished, you do not need to buy one)
Scraper (furnished, you do not need to buy one)
Economy copper (3x4)
Economy copper (5”x7”)
Economy copper (8”x 10”)
Zerkall Copperplate paper (15 sheets) 22x30”
Stonehenge 15 sheets) (buy variety of colors as indicated on order form)
Speedball linocut tools with handle (one set)
Speedball #2 extra blade
Linoleum relief printing, unmounted (2) 9x12”
TRAINING
The amount of preparation to set up a printmaking studio depends on what you want to achieve. If you are a hobbyist, then you may not need drawing skills, particularly if you work in more abstract imagery. You also need not take years of training to make very excellent images.
Just for a general guide, here is what I recommend to my art students, who aspire to take the discipline quite seriously. They need to know what levels of courses are available at our university, so I give them this guideline:
Initially, all print making students will cover a broad range of the basic processes. These are presented in ARTA 2210, Into to Prints, a course that concentrates on intaglio (plate processing) and relief printing (linecut). The ARTA 3XXX intermediate print making courses cover plate and stone lithography, screen process, and additional intaglio and relief printing. In the advanced print making and independent studies, students may either continue with these traditional processes, or may evolve toward more innovative directions, such as, mixed media prints, prints as installation, 3-D constructions, or bookmaking. Eventually, students will produce a focused body of work, culminating in a final portfolio exhibition. The following competencies are expected upon completion of a degree in print making: (1) ability to focus toward individualized goals; (2) critical analysis of prints, as an art form; (3) design, drawing, and craftsmanship skills; (4) knowledge of shop techniques and print making materials; and (5) historical trends in art and how they apply to personalized exploration.
FIRE HAZARDS
What if you don't want to go the route of a serious art student? The most important advice I can give is to exercise safety. Be careful when you are around solvents. Rags soaked in oil can be flammable, even if they are away from flames. Varnishes and oils have been known to spontaneously combust, when left in a pile of rags. Keep your rags in airtight cans, especially made for this purpose.
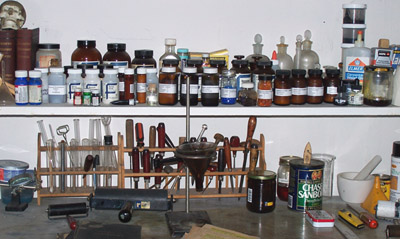
CHEMICALS
One basic chemical used in the shop are Ferric Chloride. We use this to etch our copper plates. This is not as dangerous as the old fashioned Nitric Acid or Dutch Modants. These older chemicals were extremely caustic and could leave severe burns in skin, eyes, and lungs. Only use these if you are a professional. The safer etchant is Ferric Chloride. The amount of fumes are negligible, when etching copper. Other metals such as zinc may need to be vented. Wear safety glasses and gloves whenever you are around etchants and solvents.
 | 
DESCRIPTION OF TOOLS
Tools: (click on links to see photos of the tools)
- burnisher - is a round ended tool used to smooth rough areas on an intaglio metal plate. It will remove some light scratches but is generally not used on deeper lines. It can also be used to create variation of tones in aquatints. To smooth an area of the metal, you put a drop of oil a section of the plate and begin making small circular motions, while applying pressure with the curved end of the tool.
- scraper - is a three sided sharp tool used to remove deeper scratches from a plate. A drop of oil is applied and the scraper is held in such a way as to gradually shave the surface of the scratch. At some point the metal may form a wavy surface. To remove this, you work the scraper in a different direction to the scratch.
- etching needle or twisted scribe - is a pencil-like, steel tool, usually having a point on each end. Some have corked handles. One point is usually a little sharper than the other to allow different line thicknesses. The needle function is to create scratches, either directly into the surface of the plate or to needle through a acid proof coating called, asphaltum.
- engraver's burin - is a cutting tool used by engravers. It is made of tempered steel with a sharp lozenge or diamond-shaped point, used for engraving furrows in metal, wood, or marble. This tool should not be confused with the scribe. The scribe scratches metal, whereas, the burin cuts metal. (We haven't covered this in class yet, but you need to know its meaning.)
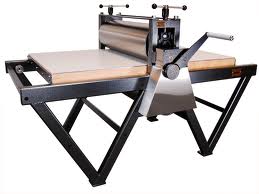
- intaglio press - is a machine used to print etchings and all other intaglio plates, operating by slipping a press bed between two rollers, one of them being adjustable to increase or decrease pressure. An etching press is easily adapted to print relief blocks.
- sizing catcher - is a thin printmaking blanket (sometimes called a Swan Skin or Fronting Blanket) that is placed over the intaglio plate. It is placed closest to the plate than the other blankets, so that it can absorb the starch from the moist printmaking paper, thereby allowing for easy cleaning.
- cushion - is a thick printmaking blanket that is placed just over the sizing catcher. Its added thickness helps to conform to the irregularities of the plate surface. The cushion blanket is 100% wool felt and is a full .25" thick. It is placed over the sizing catcher.
- pusher - is a durable woven wool blanket placed just over the pusher. It takes the abuse of the press roller. Being woven the pusher is resists wear due to abrasion from the upper drum of the etching press. The pusher blanket is .125" thick, and is made of 100% finely woven wool felt.
- roulette - is a tool with a spiked wheel used to create lines of even dots on intaglio plates. The wheel is rolled along the surface of the plate, creating patterns varing from dots to chevrons to diagonal lines. This can be used in either drypoint or etching.
- brayer - rubber or plastic roller attached to a handle, used for applying inks and other coatings in printmaking. It can also be used to smooth down paper or films. Very basic brayers have plastic handles and hard rollers. More expensive brayers may have wooden handles, but the significant difference is what the roller is made from. It should feel rubbery but firm. A softer roller helps get ink smooth, and into grooves. A harder roller gives better detail for relief printing. A medium firmness is used most often in printmaking shops.
CONCULUSION
This is about all I have time to cover in this one website. I just wanted to give a brief overview of some of the considerations one should have when venturing onto printmaking as an area of study. For a more complete overview, please visit my class website: Printmaker's Corner, all the things an Art student should know about our printmaking program. |
